Spring Security 기반의 애플리케이션에 아이디/패스워드 로그인 인증 후, 전달 받은 JWT를 이용해 서버 측 리소스에 접근한다고 가정해 봅시다.

이 경우, 매 요청마다 JWT를 request header에 포함해서 요청 전송을 할텐데요.

이 JWT를 JwtAuthorizationFilter가 검증할 경우, 두 가지 케이스를 테스트 해 보았습니다.


JwtAuthorizationFilter에서 인증이나 접근 권한 등의 예외를 try ~ catch로 잡는 경우

public class JwtVerificationFilter extends OncePerRequestFilter {
    private final JwtTokenizer jwtTokenizer;
    private final CustomAuthorityUtils authorityUtils;

    public JwtVerificationFilter(JwtTokenizer jwtTokenizer,
                                 CustomAuthorityUtils authorityUtils) {
        this.jwtTokenizer = jwtTokenizer;
        this.authorityUtils = authorityUtils;
    }

    @Override
    protected void doFilterInternal(HttpServletRequest request, HttpServletResponse response, FilterChain filterChain) throws ServletException, IOException {
       // JWT 검증 시, 발생하는 예외를 try ~ catch 문으로 catch 하는 경우
       try {
            Map<String, Object> claims = verifyJws(request);
            setAuthenticationToContext(claims);
        } catch (Exception e) {
            request.setAttribute("exception", e);
        }

        filterChain.doFilter(request, response);
    }
    
    ...
    ...
}
  • SecurityFilterChain 동작이 ExceptionTranslationFilter 까지 넘어 간다.
  • ExceptionTranslationFilter에서 다시 AuthorizationFilter로 동작이 넘어간다.
  • AuthorizationDecision.isGranted()이기 때문에 AccessDeniedException이 throw된다.
  • ExceptionTranslationFilter에서 예외를 catch 한다.
  • ExceptionTranslationFilter 내부에서 AccessDeniedException을 처리하는 로직을 수행한다.
    • handleAccessDeniedException()
      • 인증 여부를 체크해서 인증이 되지 않았으면 AuthenticationEntryPoint를 이용해 예외를 처리한다.
      • 인증은 된 상태이고 권한이 적절하지 않다면  AccessDeniedHandler를 이용해 예외를 처리한다.


JwtAuthorizationFilter에서 인증이나 접근 권한 등의 예외를 try ~ catch로 잡지 않는 경우

public class JwtVerificationFilter extends OncePerRequestFilter {
    private final JwtTokenizer jwtTokenizer;
    private final CustomAuthorityUtils authorityUtils;

    public JwtVerificationFilter(JwtTokenizer jwtTokenizer,
                                 CustomAuthorityUtils authorityUtils) {
        this.jwtTokenizer = jwtTokenizer;
        this.authorityUtils = authorityUtils;
    }

    @Override
    protected void doFilterInternal(HttpServletRequest request, HttpServletResponse response, FilterChain filterChain) throws ServletException, IOException {
        // JWT 검증 시, try ~ catch 문으로 catch 하지 않는 경우
        Map<String, Object> claims = verifyJws(request);

        filterChain.doFilter(request, response);
    }

    ...
    ...
}
  • 예외가 throw 되어서 톰캣 같은 서블릿 컨테이너 레벨까지 전파된다.
  • `/error` URL로 리다이렉트 된다.
  • Spring Framework의 BasicErrorController의 error() 핸들러 메서드가 `/error` 요청을 수신한다.
  • 디폴트 에러 메시지를 JSON 형태로 리턴한다.

Spring MVC에서 ObjectMapper로 json 포맷의 request body를 DTO 객체로 역직렬화 하는 방법은 크게 두 가지이다.

디폴트 생성자가 있을 경우,

이 경우는 다음과 같은 순서를 따라 역직렬화를 수행한다. 역직렬화의 시작점은 BeanDeserializer이다.

  1. BeanDeserializer.deserializeFromObject()에서 디폴트 생성자를 이용한 리플렉션 기법(Constructor.newInstance(Object[] args)으로 DTO 객체를 생성한다.
  2. FieldProperty.deserializeAndSet(...)에서 리플렉션으로 얻어온 Field에 JSON 포맷에서 얻은 값을 set한다. 여기서의 Field는 DTO 객체의 멤버 필드의 메타 정보를 포함한 객체이다.

디폴트 생성자가 있을 경우의 결론은 디폴트 생성자를 이용해서 Java의 리플렉션을 이용해 Field에 값을 세팅한다.


디폴트 생성자가 없을 경우,

문제는 디폴트 생성자가 없을 경우이다.

이 경우는 IntelliJ에서 Gradle 빌드 옵션(IntelliJ > Settings > Build, Execution, Deployment > Build Tools > Gradle)을 Gradle(default)로 설정하느냐 IntelliJ로 설정하느냐에 따라 다르다.

여기서의 핵심은 PropertyBasedCreator 객체가 null이냐 그렇지 않느냐이다.


Gradle 빌드 옵션을 Gradle(default)로 설정할 경우,

디폴트 생성자가 없어도 argument가 있는 Constructor 정보를 이용한 리플렉션 기법을 통해 JSON에서 DTO 객체로 역직렬화가 된다. 

PropertyBasedCreator 객체가 null이 아니다.


PropertyBasedCreator가 null이 아니므로, BeanDeserializer.deserializeFromObjectUsingNonDefault() 에서 시작해 내부적으로 더 들어 가면,

PropertyBasedCreator가 StdValueInstantiator를 이용해 역시 리플렉션 기법으로 argument가 있는 Constructor로 객체를 생성한다.

argument가 있다라는 것은 DTO 클래스의 필드에 생성자 주입을 통해 바로 값이 세팅된다라는 의미와 같다.


Gradle 빌드 옵션을 IntelliJ로 설정할 경우,

디폴트 생성자가 없으면 JSON에서 DTO 객체로 역직렬화가 되지 않는다.

PropertyBasedCreator 객체가 null이다.

PropertyBasedCreator가 null 이므로, 디폴트 생성자나 argument가 있는 생성자를 이용해 리플렉션으로 DTO 클래스의 객체를 생성할 수 없다.


PropertyBasedCreator에 대해서는 아래와 같이 설명하고 있다.

Object that is used to collect arguments for non-default creator (non-default-constructor, or argument-taking factory method) before creator can be called. Since ordering of JSON properties is not guaranteed, this may require buffering of values other than ones being passed to creator.

즉, 디폴트 생성자가 아닌 생성자의 argument를 수집하는데 사용한다고 설명이 나와 있음.


결론

  • Gradle 빌드 옵션이 Gradle(default)일 경우, 디폴트 생성자가 없어도 리플렉션을 통해 argument가 있는 Constructor 정보로 DTO 객체를 생성할 수 있다. 즉, 어떤 경우도 역직렬화가 가능하다.
  • Gradle 빌드 옵션을, IntelliJ로 설정하면 PropertyBasedCreator 객체가 생성되지 않으므로, 디폴트 생성자가 반드시 있어야지만 역직렬화가 가능하다.
  • Gradle 빌드 옵션을 바꾸지 말자.

이번 시간에는 Reactor Sequence 상에서 발생하는 signal의 전파 흐름을 알아보도록 하겠습니다.


일반적인 Signal의 전파 흐름

1
2
3
4
5
6
7
8
9
10
11
12
13
import lombok.extern.slf4j.Slf4j;
import reactor.core.publisher.Flux;
 
@Slf4j
public class ReactorSignalEventPropagationExample01 {
    public static void main(String[] args) {
        Flux
            .range(11)
            .filter(n -> n > 0)
            .map(n -> n * 2)
            .subscribe(data -> log.info("# onNext: {}", data));
    }
}
코드 1-1 일반적인 signal 이벤트 흐름
 

코드 1-1은 Reactor Sequence 상에서 발생하는 signal의 전파 흐름을 확인하기 위한 예제 코드입니다.

예제 코드 상에는 log() Operator가 빠져있지만 range(), filter(), map() Operator 하단에 각각 log() Operator를 추가해서 실행하면 아래와 같은 로그를 출력합니다.

1
2
3
4
5
6
7
8
9
10
11
12
13
14
18:51:02.355 [main] DEBUG reactor.util.Loggers - Using Slf4j logging framework
18:51:02.369 [main] INFO log.range - | onSubscribe([Synchronous Fuseable] Operators.ScalarSubscription)
18:51:02.371 [main] INFO log.filter - | onSubscribe([Fuseable] FluxFilterFuseable.FilterFuseableSubscriber)
18:51:02.371 [main] INFO log.map - | onSubscribe([Fuseable] FluxMapFuseable.MapFuseableSubscriber)
18:51:02.372 [main] INFO log.map - | request(unbounded)
18:51:02.372 [main] INFO log.filter - | request(unbounded)
18:51:02.372 [main] INFO log.range - | request(unbounded)
18:51:02.372 [main] INFO log.range - | onNext(1)
18:51:02.372 [main] INFO log.filter - | onNext(1)
18:51:02.372 [main] INFO log.map - | onNext(2)
18:51:02.372 [main] INFO com.codestates.example.schedulers.SchedulersExample04 - # onNext: 2
18:51:02.373 [main] INFO log.range - | onComplete()
18:51:02.373 [main] INFO log.filter - | onComplete()
18:51:02.373 [main] INFO log.map - | onComplete()


로그를 보면, 코드 1-1에서 발생하는 signal은 아래와 같은 순서로 전파됩니다.

range | onSubscribe() --> filter | onSubscribe() --> map | onSubscribe()
--> map | request() --> filter | request() --> range | request()
--> range | onNext() --> filter | onNext() --> map | onNext()
--> range | onComplete() --> filter | onComplete() --> map | onComplete()


이를 통해 알 수 있는 사실 두 가지를 살펴보면,

먼저 대부분의 Operator들은 각각 자신만의 Subscriber를 포함하고 있고, 이 Subscriber와 서로 signal을 주고 받으면서 데이터를 전송하고 데이터를 전달 받는다는 것을 알 수 있습니다.

다름으로 onSubscribe, onNext, onComplete signal은 Downstream 쪽으로 전파되고, request signal은 Upstream 쪽으로 전파되는 것을 알 수 있습니다.


subscribeOn()이 추가되었을 때 Signal의 전파 흐름

그렇다면 subscribeOn() Operator가 Operator 체인에 추가되면 signal의 전파 흐름은 어떻게 변할까요?


1
2
3
4
5
6
7
8
9
10
11
12
13
14
15
16
17
import lombok.extern.slf4j.Slf4j;
import reactor.core.publisher.Flux;
import reactor.core.scheduler.Schedulers;
 
@Slf4j
public class ReactorSignalEventPropagationExample02 {
    public static void main(String[] args) throws InterruptedException {
        Flux
            .range(11)
            .doOnSubscribe(subscription -> log.info("# doOnSubscribe"))
          .subscribeOn(Schedulers.boundedElastic()) // (1)
            .map(n -> n * 2)
            .subscribe(data -> log.info("# onNext: {}", data));
 
        Thread.sleep(100L);
    }
}
 

코드 1-2는 subscribeOne() Operator가 Operator체인에 추가되었을 때 signal의 전파 흐름을 살펴보기 위한 예제 코드입니다. ( 로그 출력 결과가 복잡해 보일 것 같아 filter() Operator는 제외했습니다.)

코드 1-1과 마찬가지로 log() Operator를 각각의 Operator 다음에 추가해서 코드를 실행하면 로그 출력 결과는 아래와 같습니다.

1
2
3
4
5
6
7
8
9
10
11
12
13
14
15
16
17
18
21:48:27.992 [main] INFO log.subscribeOn - onSubscribe(FluxSubscribeOn.SubscribeOnSubscriber)
21:48:27.993 [main] INFO log.map - onSubscribe(FluxMap.MapSubscriber)
21:48:27.994 [main] INFO log.map - request(unbounded)
21:48:27.994 [main] INFO log.subscribeOn - request(unbounded)
21:48:28.003 [boundedElastic-1] INFO log.range - | onSubscribe([Synchronous Fuseable] Operators.ScalarSubscription)
21:48:28.004 [boundedElastic-1] INFO com.codestates.example.schedulers.SchedulersExample05 - # doOnSubscribe
21:48:28.005 [boundedElastic-1] INFO log.doOnSubscribe - | onSubscribe([Fuseable] FluxPeekFuseable.PeekFuseableSubscriber)
21:48:28.006 [boundedElastic-1] INFO log.doOnSubscribe - | request(unbounded)
21:48:28.006 [boundedElastic-1] INFO log.range - | request(unbounded)
21:48:28.006 [boundedElastic-1] INFO log.range - | onNext(1)
21:48:28.006 [boundedElastic-1] INFO log.doOnSubscribe - | onNext(1)
21:48:28.006 [boundedElastic-1] INFO log.subscribeOn - onNext(1)
21:48:28.006 [boundedElastic-1] INFO log.map - onNext(2)
21:48:28.006 [boundedElastic-1] INFO com.codestates.example.schedulers.SchedulersExample05 - # onNext: 2
21:48:28.006 [boundedElastic-1] INFO log.range - | onComplete()
21:48:28.006 [boundedElastic-1] INFO log.doOnSubscribe - | onComplete()
21:48:28.006 [boundedElastic-1] INFO log.subscribeOn - onComplete()
21:48:28.006 [boundedElastic-1] INFO log.map - onComplete()


로그가 좀 복잡해보이는데 어쨌든 코드 1-2의 signal 전파 흐름을 보면 코드 1-1과 조금 다르다른 것을 알 수 있습니다.

subscribeOn()이 추가되지 않았던 코드 1-1에서는 range()부터 차례대로 onSubscribe signal이 전파되었는데 코드 1-2의 경우에는 subscribeOn()부터 onSubscribe signal이 Downstream쪽으로 전파되고, request signal이 다시 Upstream 쪽으로 전파되지만 range()까지 전파되는 것이 아니라 subscribeOn()까지만 전파되고 이 후 부터는 range()부터 onSubscribe signalsubscribeOn()까지만 전파된 후에 request signal이 다시 range()까지 전파되고 이 후부터는 onNext signal이 Downstream 끝까지 전파되고, 다음에 onComplete signal 역시 Downstream 끝까지 전파되는 것을 알 수 있습니다.

signal의 전파 흐름이 굉장히 복잡한데 이 복잡함을 덜 복잡하게 이해하기 위해서는 signal의 전파 흐름을 subscribeOn() Operator를 기준으로 생각하면 됩니다.

subscribeOn() Operator를 기준으로 signal 흐름을 요약하면,

먼저 onSubscribe signal이 Downstream 쪽으로 전파
-> request signal이 Upstream 쪽으로 전파되지만 subscribeOn() Operator까지만 전파
-> range() 부터 onSubscribe signal이 전파되지만 subscribeOn() 까지만 전파
-> request signal이 Upstream 쪽으로 전파
-> onNext signal이 Downstream 끝까지 전파
-> onComplete signal이 Downstream 끝까지 전파


위에서 설명한 signal 전파 흐름을 코드 상의 흐름으로 간략하게 표현하면 아래의 [그림 1-1]과 같습니다.

[그림 1-1] subscribeOn()이 추가될 경우의 signal 전파 흐름


그리고, subscribeOn() Operator가 추가 되었을 때 signal 전파 흐름이 어떻게 되는지 Reactor 코드 내부에서 사용되는 코드를 통해 조금 더 구체적으로 표현하면 아래의 [그림 1-2]와 같습니다.

[그림 1-2] subscribeOn()이 추가될 경우의 signal 전파 흐름(detail description)

[그림 1-2]의 signal 전파 흐름이 꽤 복잡해 보이지만 Reactor에서 실제 사용되는 컴포넌트들을 이용해 [그림 1-1]을 조금 더 구체적으로 표현한 것 뿐입니다.

만일 [그림 1-2]를 이해하는것이 어렵게 느껴진다면 [그림 1-1]만 이해해도 충분하다고 생각합니다.


Operator 체인상에서 doOnSubscribe()의 위치에 따른 실행 쓰레드의 변경

[그림 1-2]를 보면 doOnSubscribe() Operator는 subscribeOn() 위 쪽에 추가되어있습니다. 

이 경우, doOnSubscribe()의 실행 쓰레드는 코드 1-2의 로그 출력 결과에서도 확인할 수 있다시피 boundedElastic-1 쓰레드에서 실행되는 이유가 뭘까요?

doOnSubscribe() Operator는 onSubscribe()가 호출되었을 때 이어서 호출되는 일종의 콜백입니다.
따라서 onSubscribe()가 호출될 때의 실행 쓰레드와 동일한 쓰레드에서 실행이 됩니다.

doOnSubscribe()를 호출되게 하는 onSubscribe()는 어디서 호출될까요?

[그림 1-2]의 signal 전파 흐름에서도 알 수 있듯이 range()에서 onSubscribe()가 호출되면 뒤이어 doOnSubscribe()가 호출됩니다.

range()의 실행 쓰레드는? 

바로 boundedElastic-1 쓰레드입니다. 

따라서 range()에서 호출하는 onSubscribe()도 boundedElastic-1 쓰레드이고, doOnSubscribe()의 실행 쓰레드 역시 boundedElastic-1 쓰레드입니다.


만약 doOnSubscribe()subscribeOn() 바로 아래에 추가한다면 doOnSubscribe()의 실행 쓰레드는 무엇일까요?

이 경우, doOnSubscribe()의 실행 쓰레드는 subscribeOn()에서 호출되는 onSubscribe()의 영향을 받습니다.

[그림 1-2]에서 subscribeOn()의 실행 쓰레드는 무엇인가요?

바로 main 쓰레드입니다.

따라서 subscribeOn()에서 호출하는 onSubscribe() main 쓰레드이고, doOnSubscribe()의 실행 쓰레드 역시 main 쓰레드입니다.


헷갈리겠지만 이것 하나만 기억하면 됩니다.

doOnSubscribe()의 실행 쓰레드는 doOnSubscribe() 바로 위 쪽에 있는 Operator가 호출하는 onSubscribe()의 실행 쓰레드와 같다.


이 글이 Reactor Sequence 상에서 발생하는 signal의 전파 흐름과 subscribeOn()과 doOnSubscribe()의 실행 쓰레드의 관계를 이해하는데 조금이라도 도움이 될 수 있길 바래봅니다.

'리액티브 프로그래밍 > Reactor' 카테고리의 다른 글

Hello Reactor 들여다 보기  (2) 2021.01.06
리액터와 WebFlux  (0) 2021.01.06

1️⃣ OAuth2LoginAuthenticationFilter

  • OAuth 2 인증을 처리하기 위한 Filter

2️⃣ CommonOAuth2Provider

  • 신뢰할 만한 OAuth 2 Provider 목록 제공
  • 실질적으로 각 Provider에게 넘겨줘야 되는 Client 정보를 포함한 ClientRegistration 객체를 생성한다.

3️⃣ ClientRegistration

  • 각 OAuth 2 Provider 사용을 위해 Client에게 필요한 등록 정보
public enum CommonOAuth2Provider {

	GOOGLE {

		@Override
		public Builder getBuilder(String registrationId) {
			ClientRegistration.Builder builder = getBuilder(registrationId,
					ClientAuthenticationMethod.CLIENT_SECRET_BASIC, DEFAULT_REDIRECT_URL);
      // Provider가 제공할 Resource 범위
			builder.scope("openid", "profile", "email");

      // Client가 OAuth 2 인증을 위해 Redirect하는 URI(구글의 로그인 인증 화면)
			builder.authorizationUri("<https://accounts.google.com/o/oauth2/v2/auth>");

      // Client가 Access Token과 Refresh Token을 얻기 위해 호출하는 URI
			builder.tokenUri("<https://www.googleapis.com/oauth2/v4/token>");

      // JWT 검증용 Key Set을 조회할 수 있는 URI
			builder.jwkSetUri("<https://www.googleapis.com/oauth2/v3/certs>");

      // Access Token 발행자 정보 조회 URI
			builder.issuerUri("<https://accounts.google.com>");

      // Resource Owner의 User Info를 조회하기 위한 URI
			builder.userInfoUri("<https://www.googleapis.com/oauth2/v3/userinfo>");

      // Resource Owner의 이름에 접근하기 위한 Attribute Name
			builder.userNameAttributeName(IdTokenClaimNames.SUB);

      // Client Name. Provider를 구분하는 용도로 사용
			builder.clientName("Google");
			return builder;
		}

	},
  
  ...
  ...

}


4️⃣ OAuth2AuthorizedClientService

  • OAuth 2로 인증된 Client(OAuth2AuthorizedClient)를 관리하는 서비스 클래스
  • OAuth2AuthorizedClientService 인터페이스의 구현 클래스
    • InMemoryOAuth2AuthorizedClientService
    • JdbcOAuth2AuthorizedClientService


5️⃣ ClientRegistrationRepository

  • OAuth 2로 인증된 Client(OAuth2AuthorizedClient)를 저장하는 역할을 한다.
    • ClientRegistrationRepository 인터페이스의 구현 클래스
      • InMemoryClientRegistrationRepository
  • OAuth2AuthorizedClientService가 ClientRegistrationRepository를 사용해 OAuth2AuthorizedClient 를 저장한다.


6️⃣ OAuth2AuthorizedClientManager

  • OAuth2AuthorizedClient 를 관리하는 관리자 역할을 한다.


7️⃣ OAuth2AuthorizedClientProvider

  • Authorization Grant 유형을 설정할 수 있는 인터페이스
    • Authorization Code
    • Implicit Grant Type
    • Client Credentials
    • Resource Owner Password Credentials

Spring MVC 기반의 웹 애플리케이션을 개발하다보면 Interceptor나 AOP Advice 등에서 request body를 사용해야하는 경우가 종종 있을 수 있습니다.

reqeust 전송 시, header에 추가되 전송되는 JWT의 claims에 포함된 memberId와 request body에 포함된 memberId가 동일한지를 검증하는 예를 들어보겠습니다.

@Slf4j
@Component
@Aspect
public class MemberVerifyAdvice extends VerifyAdvice {
    private final ObjectMapper objectMapper;
    public MemberVerifyAdvice(JwtTokenizer jwtTokenizer, ObjectMapper objectMapper) {
        super(jwtTokenizer);
        this.objectMapper = objectMapper;
    }

    @Pointcut(
            "execution(* com.itvillage.member.controller.MemberController.postQnaQuestionOfMember(..)) || " +
                    "execution(* com.itvillage.qna.controller.QnaQuestionController.postAnswerOfQuestion(..))"
    )
    public void verifyMySelfWithPointcut(){}

    @Before(value = "verifyMySelfWithPointcut()")
    public void verifyMySelf(JoinPoint joinPoint) throws IOException {
        String jws = getHeader("Authorization").substring(7);
        long memberIdFromJws = getMemberIdFromJws(jws);

        long memberIdFromRequest = extractMemberId();

        checkSameMember(memberIdFromJws, memberIdFromRequest);

    }

    private long extractMemberId() throws IOException {
        // (1)
        HttpServletRequest request = 
                  ((ServletRequestAttributes)RequestContextHolder.currentRequestAttributes()).getRequest();
        
        
        String body = IOUtils.toString(request.getReader());  // (2-1)
        or
        String body = 
        	StreamUtils.copyToString(request.getInputStream(), StandardCharsets.UTF_8); // (2-2)

        ...
        ...
        
    }
}

코드 1-1 MemberVerifyAdvice

먼저 코드 1-1에서 처럼 request body를 파싱하기 위해 AOP Advice에서 (1)과 같이 RequestContextHolder를 이용해 HttpServletRequest를 얻습니다.

그리고 (2-1)과 같이 apache commons io 라이브러리를 이용하거나 (2-2)와 같이 Spring에서 제공하는 StreamUtils를 이용해 request body를 얻기 위한 시도를 할 수 있습니다.

그런데 (2-1) 또는 (2-2)와 같은 코드가 실행되면 request body가 비어있거나 getInputStream() has already been called for this request 같은 에러가 발생해 정상적으로 request body를 얻을 수 없습니다.

⭐ 이유는 Spring Boot에 내장된 Tomcat의 경우 HttpServletRequest의 InputStream을 한번 read 하게되면 다시 읽을 수 없도록 구현되어 있기 때문입니다.

즉, 이 말은 AOP Advice에서 얻은 HttpServletRequest는 Advice에 도달하기 전에 이미 어딘가에서 InputStream을 read 했다는 의미와도 같습니다.

Advice에서 request body를 정상적으로 사용하려면 어떻게 해야할까요?

이런 경우에는 InputStream을 애플리케이션 어딘가에서 read 하기 전에 ContentCachingRequestWrapper를 이용해 원본 HttpServletRequest를 캐싱해 두면 됩니다.

즉, 캐싱해서 저장해 두었다가 나중에 필요할 때 꺼내서 사용할 수 있도록 하는 것입니다.

ContentCachingRequestWrapper로 원본 HttpServletRequest를 캐싱하기 좋은 지점은 바로 필터입니다.

필터를 하나 추가해서 해당 필터에서 ContentCachingRequestWrapper로 원본 HttpServletRequest를 캐싱하면 됩니다.


ContentCachingRequestWrapper로 원본 HttpServletRequest를 캐싱하기

Filter 생성

import org.springframework.web.filter.OncePerRequestFilter;
import org.springframework.web.util.ContentCachingRequestWrapper;
import org.springframework.web.util.ContentCachingResponseWrapper;

import javax.servlet.FilterChain;
import javax.servlet.ServletException;
import javax.servlet.http.HttpServletRequest;
import javax.servlet.http.HttpServletResponse;
import java.io.IOException;

public class HttpServletWrappingFilter extends OncePerRequestFilter {
    @Override
    protected void doFilterInternal(HttpServletRequest request,
                                    HttpServletResponse response,
                                    FilterChain filterChain) throws ServletException, IOException {
        // ContentCachingRequestWrapper로 HttpServletRequest 캐싱
        ContentCachingRequestWrapper wrappingRequest = new ContentCachingRequestWrapper(request);
        ContentCachingResponseWrapper wrappingResponse = new ContentCachingResponseWrapper(response);
        filterChain.doFilter(wrappingRequest, wrappingResponse);
        wrappingResponse.copyBodyToResponse();
    }
}

코드 1-2 HttpServletWrappingFilter

코드 1-2와 같이 ContentCachingRequestWrapper를 이용해 HttpServletRequest와 HttpServletResponse를 캐싱하는 필터를 생성합니다.

이렇게하면 나중에 원본 HttpServletRequest를 사용하고자 하는 곳에서 ContentCachingResponseWrapper를 이용해 request body를 사용하면 됩니다.


Filter 추가

@Configuration
public class WebConfiguration {
    @Bean
    public FilterRegistrationBean<HttpServletWrappingFilter> firstFilterRegister()  {
    	// HttpServletWrappingFilter 추가
        FilterRegistrationBean<HttpServletWrappingFilter> registrationBean =
                new FilterRegistrationBean<>(new HttpServletWrappingFilter());
        registrationBean.setOrder(Integer.MIN_VALUE);

        return registrationBean;
    }
}

코드 1-3 FilterRegistrationBean

코드 1-3과 같이 FilterRegistrationBean을 이용해 앞에서 생성한 HttpServletWrappingFilterFilterChain에 추가합니다.


ContentCachingRequestWrapper로 원본 HttpServletRequest 사용

@Slf4j
@Component
@Aspect
public class MemberVerifyAdvice extends VerifyAdvice {
    private final ObjectMapper objectMapper;
    public MemberVerifyAdvice(JwtTokenizer jwtTokenizer, ObjectMapper objectMapper) {
        super(jwtTokenizer);
        this.objectMapper = objectMapper;
    }

    @Pointcut(
            "execution(* com.itvillage.member.controller.MemberController.postQnaQuestionOfMember(..)) || " +
                    "execution(* com.itvillage.qna.controller.QnaQuestionController.postAnswerOfQuestion(..))"
    )
    public void verifyMySelfWithPointcut(){}

    @Before(value = "verifyMySelfWithPointcut()")
    public void verifyMySelf(JoinPoint joinPoint) throws IOException {
        String jws = getHeader("Authorization").substring(7);
        long memberIdFromJws = getMemberIdFromJws(jws);

        long memberIdFromRequest = extractMemberId();

        checkSameMember(memberIdFromJws, memberIdFromRequest);

    }

    private long extractMemberId() throws IOException {
        HttpServletRequest request = 
                  ((ServletRequestAttributes)RequestContextHolder.currentRequestAttributes()).getRequest();
        
		// (1)
		ContentCachingRequestWrapper requestWrapper = WebUtils.getNativeRequest(request, ContentCachingRequestWrapper.class);
        byte[] body = requestWrapper.getContentAsByteArray();  // (2)
        
        ...
        ...
        
    }
}

코드  1-3 개선된 MemberVerifyAdvice

코드 1-3과 같이 (1)에서 WebUtils를 이용해 ContentCachingRequestWrapper 얻은 후에  (2)에서 ContentCachingRequestWrapper의 getContentAsByteArray()로 request body를 얻고 있습니다.


이 글에서 처럼 request body를 read하려는데 정상적으로 read하지 못하는 경우가 있다면 이 글이 도움이 되길 바래봅니다.

Spring Security에서 JWT를 발급 받는 방법은 크게 두 가지로 볼 수 있습니다.

첫째는 구글 검색을 통해서도 흔히 볼 수 있는 Controller를 이용해서 아이디/패스워드 로그인 후, JWT를 발급 받는 방식이고, 두 번째는 Spring Security에서 지원하는 Security Filter를 확장하는 방법입니다.

Controller를 이용하는 것이 안좋은 방법이라고 보기는 힘들지만 그래도 Spring Security라는 보안 프레임워크를 사용하는 개발자 입장에서는 Controller까지 request가 전달되기 전에 Security Filter 레벨에서 인증을 처리하는 것이 조금 더 자연스럽지 않을까하는 생각을 해보게 됩니다.

이번 글에는 구체적인 코드는 없지만 JWT를 이용해 어떤식으로 인증이 처리 되는지 그리고 JWT를 이용해서 클라이언트의 자격을 검증하는 프로세스가 어떻게 진행 되는지를 그림으로만 표현하도록 하겠습니다.

이 글에 있는 그림을 보고 CSR(Client Side Rendering) 방식의 애플리케이션에서 JWT를 이용해 인증 및 클라이언트의 자격 검증 로세스를 어떻게 코드로 구현할 수 있는지에 대한 인사이트를 얻어갈 수 있기를 바래봅니다.


JWT 인증 프로세스

[그림 1-1] JWT 인증 프로세스

[그림 1-1]의 JWT 인증 프로세스는 다음과 같습니다.

  • 클라이언트가 최초 로그인 인증을 위해 username(이메일 등의 로그인 아이디)과 password를 request body에 실어서 전송합니다.
    • 백엔드 애플리케이션 쪽으로 전송된 username과 password는 JwtAuthenticationFilter에 전달되어 JwtAuthenticationFilter에서부터 클라이언트에 대한 인증 프로세스가 시작됩니다.
    • JwtAuthenticationFilterUsernamePasswordAuthenticationFilter를 확장해서 구현하면 됩니다.
  • JwtAuthenticationFilter에서 AuthenticationManager의 구현 클래스인 ProdiverManager를 거쳐 인증되지 않은(unauthenticated) Authentication 객체가 AuthenticationProvider에게 전달됩니다.
  • AuthenticationProvider는 인증되지 않은(unauthenticated) Authentication 객체에 포함된 username을 UserDetailsService의 구현 클래스인 MemberDetailsService에게 전달합니다.
    • loadUserByUsername(String username)을 이용.
  • UserDetailsService의 구현 클래스인 MemberDetailsService는 데이터베이스에서 사용자의 Credential(암호화 된 패스워드)을 조회한 뒤 조회한 Credential을 포함한 UserDetailsAuthenticationProvider에게 리턴합니다.
  • AuthenticationProvider는 전달 받은 UserDetails에 포함된 Credential(암호화 된 패스워드)과 인증되지 않은(unauthenticated) Authentication 객체에 포함된 password를 암호화 해서 둘을 비교합니다.
    • 두 패스워드를 비교해서 검증에 성공하면 인증된(authenticated) Authentication 객체를 JwtAuthenticationFilter에게 전달합니다.
    • 두 패스워드를 비교해서 검증에 실패하면 AuthenticationException을 throw합니다.
  • JwtAuthenticationFilter는 전달 받은 인증된(authenticated) Authentication을 이용해 Access Token과 Refresh Token을 생성해 response header에 추가합니다.


JWT를 이용한 클라이언트 자격 검증 프로세스

[그림 1-2] JWT를 이용한 클라이언트 자격 검증 프로세스

클라이언트 측에서 JWT를 성공적으로 전달 받았다면 이제 전달 받은 Access Token을 이용해서 백엔드 애플리케이션의 API 엔드포인트에 접근할 수 있습니다.


[그림 1-2]의 JWT를 이용한 클라이언트 자격 검증 프로세스는 다음과 같습니다.

  • 클라이언트는 백엔드 애플리케이션의 API 엔드포인트를 이용하기 위해 request를 전송할 때 마다 request header에 Access Token을 실어보냅니다.
  • JwtVerificationFilter는 전달 받은 Access Token이 유효한 JWT인지를 검증하기 위해 JwtTokenizer에게 JWT 검증을 요청합니다.
  • JwtTokenizer는 Access Token의 Signature를 검증합니다.
    • Access Token이 유효한 JWT이면 Claims를 리턴합니다.
    • Access Token이 유효하지 않으면 Exception을 throw합니다.
  • JwtVerificationFilter는 전달 받은 Claims를 이용해 username과 role 정보를 포함한 Authentication 객체를 SecurityContext 저장합니다.
    • 이제 인증된(authenticated) Authentication 객체가 SecurityContext에 저장되어 있으므로 DispatcherServlet에 도달하기 전의 마지막 Security Filter까지 문제 없이 통과할 수 있습니다.
  • DispatcherServlet부터는 Spring MVC의 기본적인 요청 처리 흐름에서 알 수 있듯이 Controller까지 요청이 전달됩니다.

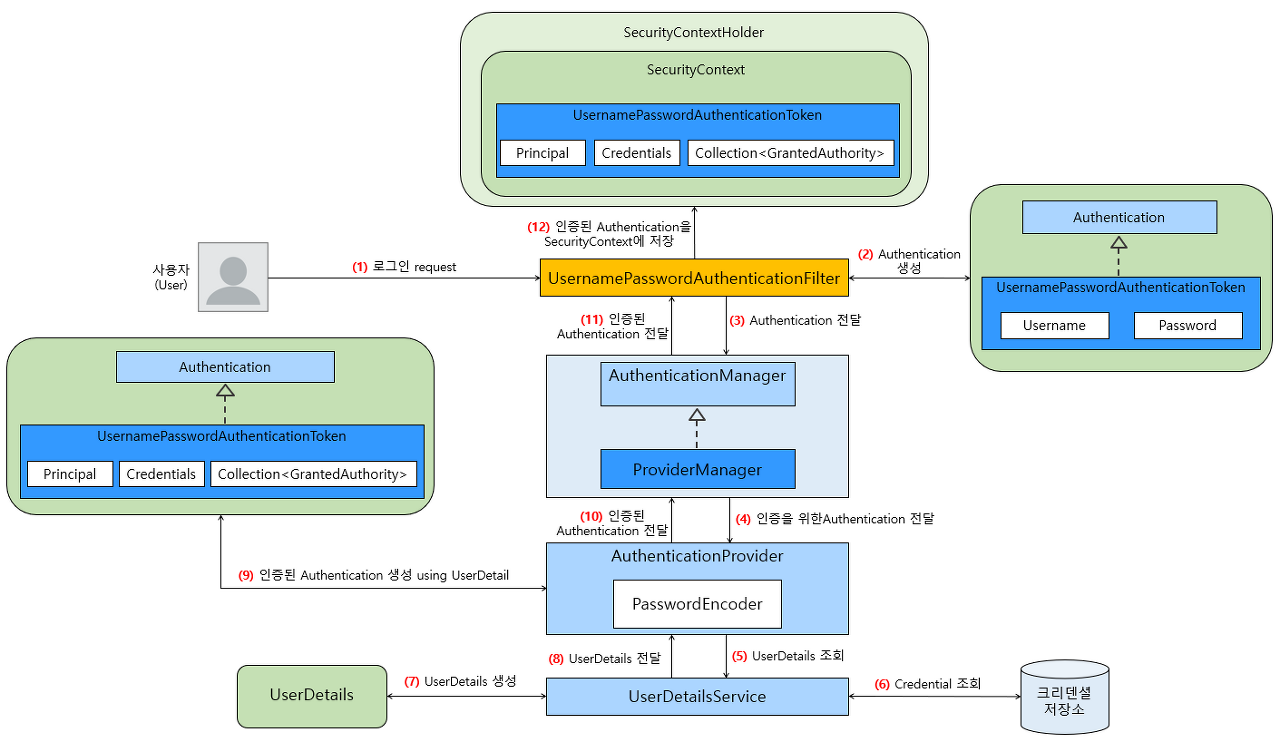
클라이언트 쪽에서 전송한 username과 password에 대한 인증을 처리하는 JwtAuthenticationFilter(UsernamePassworAuthenticationFilter를 확장)에서 로그인 인증에 성공한 뒤, JWT를 클라이언트 쪽에 응답으로 전달했다고 가정해 봅시다.

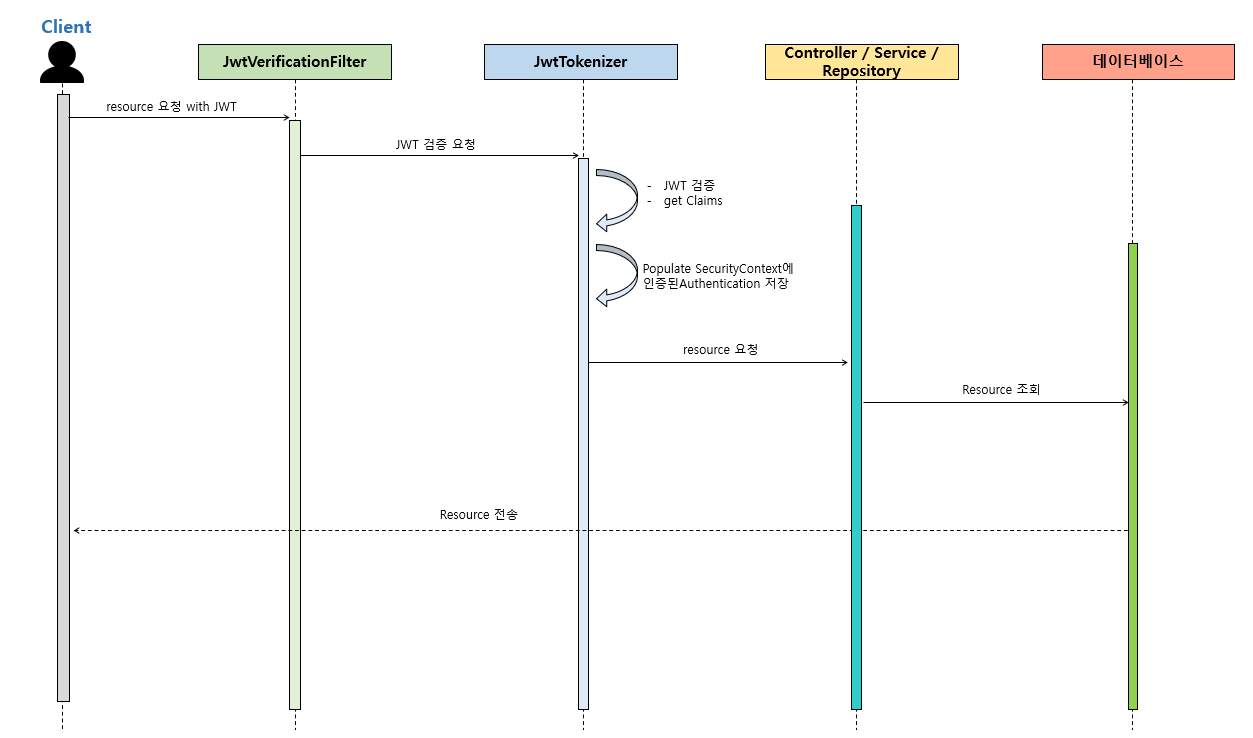
이제 클라이언트는 백엔드 애플리케이션의 API 엔드포인트를 이용할 때 마다 백엔드 애플리케이션으로부터 전달 받은 JWT를 header에 포함시켜 request를 전송합니다.

만약 JWT를 검증하는 필터인 JwtVerificationFilter 구현되어 있는 상태라면 백엔드 애플리케이션에서는 이 JwtVerificationFilter를 이용해 클라이언트의 request header 등에 포함된 JWT를 검증하는 처리를 할 것입니다.


1
2
3
4
5
6
7
8
9
10
11
12
13
14
15
16
17
18
19
20
21
22
23
24
25
26
public class JwtVerificationFilter extends OncePerRequestFilter {
    ...
    ...
 
    @Override
    protected void doFilterInternal(HttpServletRequest request, 
                                    HttpServletResponse response, 
                                    FilterChain filterChain) throws ServletException, IOException {
        // System.out.println("# JwtVerificationFilter");
 
        try {
            Map<String, Object> claims = verifyJws(request);    // (1)
            setAuthenticationToContext(claims);           // (2)
        } catch (SignatureException se) {
            request.setAttribute("exception", se);
        } catch (ExpiredJwtException ee) {
            request.setAttribute("exception", ee);
        } catch (Exception e) {
            request.setAttribute("exception", e);
        }
 
        filterChain.doFilter(request, response);
    }
    ...
    ...
}
코드 1-1 JwtVerificationFilter 코드 일부
cs

코드 1-1은 JwtVerificationFilter의 코드 일부입니다.

먼저 (1)에서 클라언트로부터 전달 받은 JWT를 검증합니다.

검증에 성공하면 (2)에서 처럼 인증된(authenticated) Authentication 객체를 SecurityContext에 저장합니다.

🙄 그런데 만약에 (2)와 같이 Authentication 객체를 SecurityContext에 저장하지 않으면 어떻게 될까요?

SecurityFilterChain에서 아직 처리가 진행되지 않은 즉, 뒤에 남아있는 Filter 어딘가에서 SecurityContext에 저장된 Authentication 객체가 있는지 확인했는데 Authentication 객체가 존재하지 않아서 결국엔 정상적인 요청 프로세스가 진행되지 못하고 클라이언트 쪽에 에러 메시지를 전송하게 됩니다.

따라서 JWT 검증 이후에 SecurityContext에 Authentication 객체를 반드시 저장해 주어야 한다는 사실을 기억해야 합니다.

그런데 이런 생각을 해볼 수 있습니다. 

💡
코드 1-1과 같은 로직에서는 클라이언트 쪽에서 request를 전송할 때 마다 JWT를 검증하고, SecurityContext에 Authentication 객체를 매 번 저장할 텐데 SecurityContext에 Authentication 객체가 매번 저장되어서 쌓여있거나(물론 그런일은 없겠지만), Authentication 객체가 SecurityContext에 남아 있는건 아닐까?

다행히 Spring Security에서는 적절한 시점에 SecurityContext를 사용할 수 없도록 Authentication 객체가 저장되어 있는 SecurityContext 자체를 삭제합니다.

그 적절한 시점은 언제일까요?

클라이언트의 요청을 모두 처리하고 응답을 리턴하는 어느 시점에 더이상 Authentication 객체가 필요 없어질텐데요.

더이상 필요없어진 SecurityContext를 삭제하는 역할을 하는 것이 바로 SecurityContextPersistenceFilter입니다.

SecurityContextPersistenceFilter는 SecurityContext를 저장, 로드, 삭제하는 등의 역할을 합니다.


1
2
3
4
5
6
7
8
9
10
11
12
13
14
15
16
17
18
19
20
21
22
23
24
25
26
27
28
29
30
31
32
33
34
35
36
37
38
39
40
41
42
43
44
45
46
47
48
49
50
51
52
53
54
55
56
57
public class SecurityContextPersistenceFilter extends GenericFilterBean {
    ...
    ...
 
    public SecurityContextPersistenceFilter() {
        this(new HttpSessionSecurityContextRepository());
    }
 
    public SecurityContextPersistenceFilter(SecurityContextRepository repo) {
        this.repo = repo;
    }
 
    ...
    ...
 
    private void doFilter(HttpServletRequest request, 
                          HttpServletResponse response, 
                          FilterChain chain)
            throws IOException, ServletException {
        ...
        ...
        
        HttpRequestResponseHolder holder = new HttpRequestResponseHolder(request, response);
        
        // (1)
        SecurityContext contextBeforeChainExecution = this.repo.loadContext(holder);
        try {
            SecurityContextHolder.setContext(contextBeforeChainExecution);
            if (contextBeforeChainExecution.getAuthentication() == null) {
                logger.debug("Set SecurityContextHolder to empty SecurityContext");
            }
            else {
                if (this.logger.isDebugEnabled()) {
                    this.logger
                            .debug(LogMessage.format("Set SecurityContextHolder to %s", contextBeforeChainExecution));
                }
            }
            chain.doFilter(holder.getRequest(), holder.getResponse());
        }
        finally {
            SecurityContext contextAfterChainExecution = SecurityContextHolder.getContext();
            
            // (2)
            SecurityContextHolder.clearContext();
            
            // (3)
            this.repo.saveContext(contextAfterChainExecution, holder.getRequest(), holder.getResponse());
            request.removeAttribute(FILTER_APPLIED);
            this.logger.debug("Cleared SecurityContextHolder to complete request");
        }
    }
 
    public void setForceEagerSessionCreation(boolean forceEagerSessionCreation) {
        this.forceEagerSessionCreation = forceEagerSessionCreation;
    }
 
}

코드 1-2 SecurityContextPersistenceFilter 코드 일부 
cs

코드 1-2는 SecurityContextPersistenceFilter의 코드 일부입니다.

먼저 JWT가 request header 등에 포함되어 전송되었다고 가정하면 SecurityFilterChain의 Filter 중 하나인 SecurityContextPersistenceFilter에 request가 전달 되었을 때,

(1)과 같이 SecurityContextRepository에서 기존에 저장되어 있는 SecurityContext를 로드하는데 JWT를 이용하는 방식에서는 이 SecurityContext 객체 안에 Authenticaion 객체가 저장되어 있지 않습니다.

이유는 JWT 인증 방식은 Stateless 즉, HttpSession에서 인증된 Authentication을 포함한 SecurityContext를 관리하지 않기 때문인데요.

HttpSession을 사용하지 않는 이유는 아래에서 다시 설명하겠습니다.


어쨌든 SecurityFiterChain의 실행이 끝난 시점 즉, 클라이언트의 요청이 Controller를 거쳐서 처리를 다 끝낸 후에 메서드 실행 흐름이 SecurityContextPersistenceFilter로 넘어오게 되면 (2)와 같이 SecurityContext를 비우게 됩니다.

물론 (3)에서 SecurityFilterChain 실행 후에 생성된 contextAfterChainExecution(clear하기 직 전에 인증된 Authentication 객체가 저장되어 있는 SecurityContext)이 SecurityContextRepository에 저장되긴 하는데, 여기서 저장되는 contextAfterChainExecution는 Spring Security가 Session 인증 방식으로 동작할 경우에는 HttpSession에 contextAfterChainExecution을 저장하고, JWT 인증 방식으로 동작할 경우에는 HttpSession에 저장하는 것이 아니라 단순히 this.repo.saveContext(...)와 같이 메서드 호출만 할 뿐이지 내부적으로는 아무 동작도 하지 않습니다.

이렇게 SecurityContextRepositorysaveContext(...)를 호출하지만 아무런 동작도 하지 않는 이유는  JWT 인증 방식을 사용하기 위해 SecurityConfiguration에서 아래와 같은 설정을 추가하기 때문입니다.

.sessionManagement().sessionCreationPolicy(SessionCreationPolicy.STATELESS)

SessionCreationPolicy.STATELESS는 HttpSession을 사용하지 않겠다는 의미인데, 이 경우 코드 1-2의 (3)에서 사용하는 SecurityContextRepository의 구현 클래스는 HttpSessionSecurityContextRepository가 아니라 NullSecurityContextRepository가 됩니다. NullSecurityContextRepositorysaveContext(...)는 아래와 같습니다.

public final class NullSecurityContextRepository implements SecurityContextRepository {
	...
    ...
    
	@Override
	public void saveContext(SecurityContext context, 
    						HttpServletRequest request, 
                            HttpServletResponse response) {
	}

}

코드를 보면, NullSecurityContextRepository의 saveContext(...)에는 아무런 로직이 없이 그냥 비어있습니다. 😑


SecurityContext를 clear 한다는 의미는 무엇일까?

마지막으로 한 가지만 더 이야기 하고 이번 글을 마치도록 하겠습니다.

우리가 코드 1-2의 (2)에서 SecurityContextHolder.clearContext();를 통해 SecurityContext를 비운다(clear)라고 했습니다.

여기서 clear의 의미는 정확하게 무엇일까요?

SecurityContext를 관리하는 관리 주체는 SecurityContextHolder인데, SecurityContextHolder는 SecurityContext를 어떻게 관리할지에 대한 몇 가지 전략(SecurityContextHolderStrategy)을 취할 수 있습니다.

시스템 프로퍼티에 별도의 전략을 설정하지 않을 경우, 디폴트 전략은 ThreadLocalSecurityContextHolderStrategy입니다.

즉, SecurityContext를 ThreadLocal 변수에 저장해서 관리하겠다라는 전략입니다.

이 말은 clearContext()를 호출하면 현재 실행 중인 Thread에서 사용하는 ThreadLocal 변수에 저장된 데이터 즉, SecurityContext 객체를 지우겠다라는 의미입니다.

실제로 ThreadLocalSecurityContextHolderStrategy의 코드를 보면 아래와 같이 구성되어 있습니다.

final class ThreadLocalSecurityContextHolderStrategy implements SecurityContextHolderStrategy {

   // (1) SecurityContext를 ThreadLocal 변수에서 관리한다.
   private static final ThreadLocal<SecurityContext> contextHolder = new ThreadLocal<>();

   @Override
   public void clearContext() {
      contextHolder.remove();
   }

   @Override
   public SecurityContext getContext() {
      SecurityContext ctx = contextHolder.get();
      if (ctx == null) {
         ctx = createEmptyContext();
         contextHolder.set(ctx);
      }
      return ctx;
   }

   @Override
   public void setContext(SecurityContext context) {
      Assert.notNull(context, "Only non-null SecurityContext instances are permitted");
      contextHolder.set(context);
   }

   @Override
   public SecurityContext createEmptyContext() {
      return new SecurityContextImpl();
   }

}

코드를 보면 (1)과 같이 ThreadLocal<SecurityContext> 필드 변수를 포함하고 있으며, setContext(SecurityContext context)로 SecurityContext를 ThreadLocal 변수에 저장하고, getContext()로 ThreadLocal 변수에 저장된 SecurityContext를 가지고 옵니다.

그리고 clearContext()ThreadLocal 변수에 저장되어 있는 SecurityContext를 제거하고 있습니다.


SecurityContextPersistenceFilter의 역할

추가로 SecurityContextPersistenceFilter의 역할에 대해서 아래와 같이 간단하게 정리하고 글을 마무리 하도록 하겠습니다.

✔️ SecurityFilterChain이 시작하는 시점에.

👉 세션 기반 자격 증명일 경우,

  • HTTP Session에서 SecurityContext를 로드(load)한다.
  • 로드한 SecurityContext를 SecurityContextHolder에 저장한다(hold)

👉 토큰 기반(JWT 등) 자격 증명일 경우,

  • 비어있는 SecurityContext를 로드(load)한다. 즉, 아무일도 하지 않음.
  • 로드한 비어 있는 SecurityContext를 SecurityContextHolder에 저장한다(hold)
  • ⭐⭐ 비어 있으므로 누군가가 채워줘야 한다. ⭐⭐


✔️ SecurityFilterChain이 끝나는 시점에.

👉 세션 기반 자격 증명일 경우

  • SecurityContextHolder에 저장된 SecurityContext를 제거(clear)한다.
  • SecurityContext를 HTTP Session에 저장한다.

👉 토큰 기반(JWT 등) 자격 증명일 경우,

  • SecurityContextHolder에 저장된 SecurityContext를 제거(clear)한다.


💡 참고로 SecurityContextPersistenceFilter는 Spring Security 5.7 이후로 Deprecated 되었으며, 5.7 버전 이후로는 SecurityContextPersistenceFilter 대신에 SecurityContextHolderFilter를 사용하기를 권장하고 있습니다.


이 글이 SecurityContext를 이해하는데 도움이 되셨길 바랍니다.


Spring Security의 권한 부여 처리 흐름

  • Spring Security Filter Chain에서 URL을 통해 사용자의 액세스를 제한하는 권한 부여 Filter는 바로 AuthorizationFilter 이다.
    • SecurityContextHolder로 부터 Authentication을 획득
  • SecurityContextHolder로 부터 획득한Authentication과 HttpServletRequest를 AuthorizationManager에게 전달
  • AuthorizationManager는 권한 부여 처리를 총괄하는 매니저 역할을 한다.
  • RequestMatcherDelegatingAuthorizationManagerAuthorizationManager를 구현하는 구현체 중 하나이다.
    • RequestMatcherDelegatingAuthorizationManagerRequestMatcher 평가식을 기반으로 해당 평가식에 매치되는 AuthorizationManager에게 권한 부여 처리를 위임하는 역할
    • RequestMatcherDelegatingAuthorizationManager가 직접 권한 부여 처리를 하는 것이 아니라 RequestMatcher를 통해 매치되는 AuthorizationManager 구현 클래스에게 위임
    • RequestMatcherDelegatingAuthorizationManager 내부에서 매치되는 AuthorizationManager 구현 클래스가 있다면 해당 AuthorizationManager 구현 클래스가 사용자의 권한을 체크
  • 적절한 권한이 아니라면 (5)와 같이 AccessDeniedException이 throw되고 ExceptionTranslationFilter가 AccessDeniedException을 처리

Spring Security 인증 컴포넌트의 인터랙션 과정


  • UsernamePasswordAuthenticationFilter 는 Username/Password 기반의 인증 요청을 처리한다.
    • UsernamePasswordAuthenticationToken 생성
      • 아직 인증되지 않은 Authentication 객체
  • AuthenticationManager는 인증 처리를 총괄하는 매니저 역할을 하는 인터페이스.
  • ProviderManager는 AuthenticationManager를 구현한 구현 클래스
  • UserDetails는 사용자의 자격을 증명해주는 크리덴셜(Credentials) 과 권한 정보를 가지고 있는 객체.
  • UserDetailsService가 사용자의 Credential과 권한 정보를 조회해서 UserDetails 를 생성.
  • UserDetailsService가 AuthenticationProvider에게 UserDetails 를 전달.
  • AuthenticationProvider는 전달 받은 UserDetails에서 패스워드가 일치하는지 검증.
  • AuthenticationProvider가 패스워드 검증에 성공하면 인증에 성공한 사용자의 정보(Principal, Credential, GrantedAuthorities)를 포함한 Authentication을 생성.
  • 인증된 Authentication을 전달 받은 UsernamePasswordAuthenticationFilterSecurityContextHolder를 이용해 SecurityContext인증된 Authentication을 저장.
    SecurityContext는 다시 HttpSession에 저장되어 사용자의 인증 상태를 유지.


Spring Security의 인증 컴포넌트

1️⃣ UsernamePasswordAuthenticationFilter extends AbstractAuthenticationProcessingFilter

  • Username/Password 방식의 인증 처리의 시작점

2️⃣ UsernamePasswordAuthenticationToken

  • 사용자의 인증 처리가 되기 전에는 인증되지 않은 Authentication.
    • Username과 Password 정보를 포함하고 있다.
  • 사용자의 인증 처리가 된 이후에는 인증된 Authentication
    • Principal, Authorities를 포함하고 있다.
    • Credentials 정보는 민감한 정보이므로 인증 이 후에는 제거된다.

3️⃣ AuthenticationManager

  • 인증 처리를 지시하는 매니저 역할을 한다.
  • 인증 매니저 계의 총 지배인

4️⃣ ProviderManager

  • AuthenticationManager의 구현 클래스
  • 인증 매니저 계의 지배인
  • 인증이 성공적으로 이루어진 후, Crendentials를 제거한다.
    • 인증 끝났으니까 민감한 정보는 가지고 있을 필요가 없음.

5️⃣ AuthenticationProvider

  • 인증된 사용자인지를 판단하는 역할
  • 인증 매니저의 지시를 받는 현장 담당자 역할

6️⃣ UserDetails

  • 크리덴셜 저장소에 저장된 크리덴셜 정보를 가지고 있는 객체
  • AuthenticationProvider는 UserDetailsService로부터 UserDetails를 전달 받는다.

7️⃣ UserDetailsService

  • UserDetails 객체를 생성해서 AuthenticationProvider에게 제공하는 역할을 한다.

8️⃣ SecurityContext와 SecurityContextHolder

  • 인증된 Authentication 정보를 저장하는 저장 객체
  • SecurityContext는 인증 성공 이 후, HTTP Session에 저장된다.
  • HTTP Session은 최종적으로 StandardManager의 상위 클래스인 ManagerBase에서 관리된다.
  • HTTP Session에 누가 저장 할까?
    • 최초 인증에 성공할 경우에는 UsernamePasswordAuthenticationFilter에서  HttpSessionSecurityContextRepository를 이용해 HTTP Session에 저장한다.
    • 인증 이 후에 재요청 시에는 SecurityContextPersistenceFilter가 저장한다.
      • 인증 이 후 재요청 시의 프로세스는 대략 아래와 같다.
        • HTTP 요청
        • --> SecurityContextPersistenceFilter가 HTTP Session에서 SecurityContext를 꺼낸 후, SecurityContextHolder에 저장
        • -> 이 후, 요청이 끝나는 시점에 SecurityContextPersistenceFilter의 finally 블럭에서
          • SecurityContextHolder에 저장된 SecurityContext를 지운 뒤,
          • --> HttpSessionSecurityContextRepository를 이용해 HTTP Session에 SecurityContext를 다시 저장한다.

SecurityContext의 구조


우리가 흔히 알고 있는 Spring MVC의 요청 처리 흐름 한 가운데에는 DispatcherServlet이 자리잡고 있습니다.

클라이언트로부터 들어오는 HTTP request는 Servlet Filter를 거쳐 DispatcherServlet에 전달되고, DispatcherServlet은 해당 request를 처리할 Controller를 검색하고 대상 Controller에게 request를 전달하기 위해 HandlerMapping과 HandlerAdapter 등의 컴포넌트를 이용합니다.

대부분 다 알고 있는 내용이기 때문에 자세한 설명은 필요없을 것 같습니다.

다만, 구글링을 통해 그림으로 표현한 Spring MVC의 요청 처리 흐름에 대한 자료는 많이 볼 수 있지만 코드 베이스의 자료는 생각보다 찾기 힘든 것 같아서 이 참에 코드 베이스의 흐름을 정리해 볼까 합니다.


SSR(Server Side Rendering) 방식의 코드 흐름

SSR(Server Side Rendering) 방식은 CSR(Client Side Rendering) 방식의 애플리케이션이 본격적으로 사용되기 이 전부터 사용되던 전통적인 방식으로 아파치 톰캣(Apache Tomcat) 같은 서블릿 컨테이너가 Thymeleaf 등의 템플릿 기술을 이용해 HTML 템플릿을 렌더링 한 후에 클라이언트 쪽으로 내려주는 방식입니다.

[그림 1-1] SSR 방식의 Spring MVC 요청 처리 흐름

[그림 1-1]은 우리가 흔히들 알고 있는 Spring MVC의 요청 처리 흐름 중에서 SSR(Server Side Rendering) 방식의 요청 처리 흐름입니다.

SSR 방식의 요청 처리 흐름의 특징은 ViewResolver가 적절한 뷰 정보를 해석한 후에 대상 View 객체에게 응답 데이터를 전달하고 View를 통해 이 응답 데이터를 HTML 같은 템플릿에 채워 넣어서 최종적으로 클라이언트에게 전송한다는 것입니다.

따라서 [그림 1-1]에 있는 Spring MVC 컴포넌트들을 모두 사용합니다.

SSR 방식의 요청 처리 흐름을 코드로 표현하면 다음과 같은 순서로 호출이 됩니다.

  1. DispatcherServlet
    1. doDispatch(HttpServletRequest request, HttpServletResponse response)
    2. getHandler(HttpServletRequest request)  // HandlerMapping을 통해 HandlerChain을 얻는다.
    3. HandlerAdapter ha = getHandlerAdapter(mappedHandler.getHandler());
    4. mv = ha.handle(processedRequest, response, mappedHandler.getHandler());
    5. processDispatchResult(processedRequest, response, mappedHandler, mv, dispatchException);
    6. render(mv, request, response);
    7. View view = resolveViewName(viewName, mv.getModelInternal(), locale, request);  // ViewResolver가 View를 해석해 적절한 View 객체를 얻는다.
    8. view.render(mv.getModelInternal(), request, response);  // View를 렌더링한다.
  2. ThymeleafView (Thymeleaf 템플릿 기술을 사용할 경우)
    1. render(final Map<String, ?> model, final HttpServletRequest request, final HttpServletResponse response)
    2. renderFragment(this.markupSelectors, model, request, response);
    3. String viewTemplateName = getTemplateName();
    4. ISpringTemplateEngine viewTemplateEngine = getTemplateEngine();
    5. viewTemplateEngine.process(templateName, processMarkupSelectors, context, templateWriter);
  3. TemplateEngine
    1. process(new TemplateSpec(template, templateSelectors, null,  null,null), context, writer);
    2. TemplateManager templateManager = this.configuration.getTemplateManager();
    3. templateManager.parseAndProcess(templateSpec, context, writer);
  4. TemplateManager
    1. TemplateModel cached =  this.templateCache.get(cacheKey);
    2. cached.process(processingHandlerChain);
  5. TemplateEngine
    1. writer.flush();


코드의 흐름을 보면 꽤 복잡한 흐름을 거치고 실제 내부 코드들은 더 복잡하지만 어쨌든 각각의 컴포넌트들이 각자 맡은바 역할에만 집중하고 있는 것을 볼 수 있습니다.


View를 렌더링하는 과정은 일반적으로 Thymeleaf 기술을 사용하고 있다고 가정했을 때, View 인터페이스의 구현 클래스인 ThymeleafViewTemplateEngineTemplateManager를 이용해 클라이언트에게 전송할 HTML에 응답 데이터를 채워 넣은 후, 최종 템플릿을 만듭니다.

그리고 마지막은 Writer가 write한 템플릿 데이터를 flush 해서 클라이언트에게 전달합니다.

템플릿 데이터는 TemplateEngineTemplateManager 어딘가에서 write 된다라고 생각하면 될 것 같습니다. ^^;


CSR(Client Side Rendering) 방식의 코드 흐름

CSR(Client Side Rendering) 방식은 SSR 방식처럼 HTML 템플릿을 렌더링 해서 클라이언트 쪽으로 내려주는것이 아니라 Controller가 리턴한 데이터를 주로 JSON 형태로 HTTP response body에 실어서 응답 데이터만 클라이언트 쪽에 전달해주는 방식입니다.

여기서 말하는 클라이언트는 Apache나 Nginx 같은 웹서버에서 실행되는 Frontend 측 웹 앱이 될 수도 있고, 스마트 폰에서 실행되는 네이티브 앱이 될 수도 있으며, 데스크탑에서 실행되는 데스크탑 애플리케이션이 될 수도 있습니다.

[그림 1-2] CSR 방식의 Spring MVC 요청 처리 흐름

[그림 1-2]은 Spring MVC의 요청 처리 흐름 중에서 CSR(Client Side Rendering) 방식의 요청 처리 흐름입니다.

그림에서 보다시피 View 자체가 필요 없기 때문에 ViewResolver와 View의 로직을 타지 않습니다.

private void processDispatchResult(HttpServletRequest request, HttpServletResponse response,
			@Nullable HandlerExecutionChain mappedHandler, @Nullable ModelAndView mv,
			@Nullable Exception exception) throws Exception {

		...
		...

		// HandlerAdapter가 리턴한 ModelAndView가 null이면 뷰를 렌더링하지 않는다.
		if (mv != null && !mv.wasCleared()) {
			render(mv, request, response); 
			if (errorView) {
				WebUtils.clearErrorRequestAttributes(request);
			}
		}
		else {
			if (logger.isTraceEnabled()) {
				logger.trace("No view rendering, null ModelAndView returned.");
			}
		}
		...
		...
}

위 코드는 DispatcherServlet의 processDispatchResult() 코드의 일부입니다.
코드를 보면 HandlerAdapter가 리턴 받은 ModelAndView 객체가 null이면 뷰를 렌더링하지 않는 것을 볼 수 있습니다.

즉, 이 말은 Controller에서 리턴한 객체가 ResponseEntity 같은 타입의 객체인 경우 내부적으로 ModelAndView 객체를 생성하지 않는다는 의미와도 같습니다.

CSR 방식의 요청 처리 흐름의 코드는 앞에서 살펴보았던 SSR 방식의 코드 흐름 중, DispatcherServlet의 processDispatchResult(processedRequest, response, mappedHandler, mv, dispatchException) 내부에서 render(mv, request, response)의 호출부터 이 후 나머지 과정의 처리를 생략하면 됩니다.


이 글을 통해 Spring MVC의 요청 처리 흐름을 조금 더 깊게 이해하는데 조금이라도 도움이 될 수 있길 바랍니다.

+ Recent posts

출처: http://large.tistory.com/23 [Large]